iZettle – Virtual Shop (Add, Update and Remove Products)
This instruction guide is designed for current consultants to setup a ‘virtual shop’ or POS (point of sale) system. This version uses the iPad version of the software.
Adding, Updating and Removing products
To create the front end POS system which was shown on the previous page, you’ll need to create the virtual shop in the back-end administration system which iZettle provides.
You’ll need to use a normal browser to follow the instructions below, however iZettle have a in-built system (not shown here).
Finding the products
 Firstly, you’ll need to login to your account at www.izettle.com
Once logged in, you’ll be presented with your dashboard.
Right at the top of the screen, look for the ‘Products’ option and click.
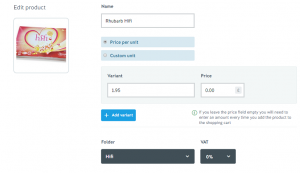
Product Information Screen
You can then click ‘add product’ to create a new one.
Above is a screenshot of the way in which we add a new Hifi product – note that it is set with its full name, an image of the product, as well as some key information, such as price and the folder it will sit in.
Once completed, click ‘Save’
The updates are done instantly. Close the app on your iPad and the details will have refreshed when you re-open the app.
Updating and Removing products
To update a product, simply click ‘edit’ on the right of the products screen
To remove a product, click ‘edit’ to the right of the product on the products screen and then click ‘delete’ on the product page
Comments/Suggestions
If you’d like any additional information adding here, please contact Steve.

